Getting Started With Docker
What is Docker?
Docker is a container. You may think of it as a self-contained space on your computer. Why would you want to create a self-contained space on your computer? Say for example you’re writing some code that depends on the latest version of some library, and you want to share this code with a client. Without a container, you’d have to make sure your client had the same version of the library as you do. This can be a pain, especially if your client is not technical. However, using Docker you can package up your code along with the software or libraries required to run it, and send it to the client as a single package.
Docker containers are similar to Virtual Machines, but are better in a few ways. While a Virtual Machine (VM) is an entire guest computer running on top of your computer, or host machine, Docker is an isolated portion of your computer that can share some of your computer’s resources. Docker shares the host kernel, operating system (OS), and sometimes host binaries, and therefore is more lightweight than a VM.
For example, if you are running a server with CentOS and have a Docker Container based on Ubuntu, then the Docker Container will have just the parts that make Ubuntu different from CentOS.
Here is an image provided by Docker that depicts the differences:
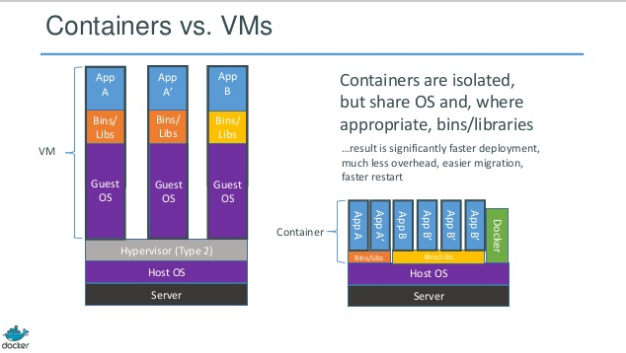
The graphic above is taken from these slides. Note the absence of a “Guest OS” in containers.
Why Docker
So why Docker? What problems does it solve for me? Docker can be useful in a few ways.
- Docker containers are fast! You are able to create a new docker container, destroy one, pull one from Docker Hub, and develop inside them with ease. Docker containers don’t take many resources from your computer and are easy to manipulate. This allows a users to make reproducible development environments much faster than with a traditional Virtual Machine.
- Modularity. It is possible to break down your application functionality into individual containers. And it is easy to link containers together to create your application. Modular code can easily be scaled and updated in the future. For example, if you want to update your database, you can update to the newest version of postgres using the same base container you used previously and then update your application without taking everything offline.
- Docker Hub! This is where there are over 100,000 containers already created. You can take these containers instead of starting from scratch. This saves you time and ensures that the enviornment is setup properly. Sending and reciving containers removes the problem of “It worked on my computer but not yours”.
Installing Docker
Docker has been moving fast since it was first released in 2013. Docker now offers an Enterprise Edition (EE) and a Comunity Edition (CE). Like most software companies, the EE version has more support but comes with an Annual subscription and the CE is for individual users and is free.
You can find the CE for your OS here. If you are using Mac or Windows they will ask you to create a free account before downloading. You will have to do this to use Docker Hub anyway, which we will talk about later. For more detailed instructions on how to download docker you can go here.
Creating Your First Container
Here we will create your first container, which may feel underwhelming. It does not show off the full magnitude of features that make developers love docker, but we must walk before we can run. First make sure you have started Docker and allocated some of your system’s resources to it. To start, I would recommend you allocate 8GB of RAM and 2 CPU cores to Docker (or 4GB and 1 CPU core if you have a less powerful computer). The good news is Docker will only take these resources when it is activated.
Docker has images called base containers. These are containers that you can pull from Docker Hub just as you would with a package manager like apt or pip. These containers are normally the bare essentials for an OS such as Ubuntu, and sometimes have pre-configured environments so you don’t have to do the setup yourself. For example, these containers can have Postgres, Spark, or Ngix already configured. Explore all the base containers on Docker Hub here. You can pull down these containers and tailor them to your needs.
One simple container is called Ubuntu. As you may have guessed, it creates a container that runs the Ubuntu operating system. This will be a pretty minimal version of Ubuntu, containing only the essentials and excluding all of the apps that would come standard with Ubuntu if you were using it as your main OS.
Now it’s finally time to make your first container by running the following in bash:
$ docker run ubuntu /bin/bash
You may say to yourself “But I didn’t pull the Ubuntu Docker image, so how will this work?”.
If the image is not already downloaded in your system, it will download it first from the repository on Docker hub. Note the use of similar terminology to version control systems such as Git.
After you use the command above you can run docker ps to display all
active containers or docker ps -a to display all containers.
You should see:
CONTAINER      IMAGE         COMMAND    CREATED          STATUS         PORTS    NAMES
4c01db0b339c   ubuntu:18.04  bash       17 seconds ago   Up 16 seconds           nostalgic_bear
Let’s breakdown this output quickly.
- CONTAINER is the ID for the specific container your just created.
- IMAGE is the base image the container was created from.
- COMMAND is the command used when you created the container.
- CREATED is how long ago the container was created.
- STATUS indicates wheither the container is still running or not.
- PORTS are the ports in use by the container.
- NAMES is the name of the specific container.
If you do not give your container a name, one will automatically be generated. You can activate and deactivate containers by their name or ID.
Now that we have pulled an image and created an image, it time to actually do something with it! First we’ll stop our container we just created by running
$ docker stop nostalgic_bear
or whatever the name of your container is. Now we will create a new container using the -i and -t tags. Before we do, it may be useful to find out what these tags mean.
We can use the --help tag to learn more.
$ docker run --help

Usage:  docker run [OPTIONS] IMAGE [COMMAND] [ARG...]

Run a command in a new container

Options:
  -i, --interactive                    Keep STDIN open even if not attached
      --rm                             Automatically remove the container
  -t, --tty                            Allocate a pseudo-TTY
  -v, --volume list                    Bind mount a volume
  -p, --publish list                   Publish a container's port(s) to
                                       the host
The true list of options is quite extensive so I cut it down to the few commands that we will talk about here. It is fine if you are unfamiliar with STDIN and Pseudo-TTY. Basically we are going to link our terminal, or command prompt, to the container we create and it will run for as long as the container is active. Now if we run the following we can interact inside the container.
$ docker run -it ubuntu
You should see the following output:
root@f81b76b39a88:/#
This shows that we are now logged in as root in the container. When you are all done you can simply run the exit command to
leave the container.
root@f81b76b39a88:/home# exit
This should stop the container as well as unlink your command prompt from it.
Dockerfile
Most people don’t want to create a container from scratch or pull a generic one from Docker Hub
each time they want to create a new container. They know what programs they want to use, perhaps they have some files they want
transferred from their host machine into the container. The best way to do that is to create a Dockerfile
and use it to create your container. Without getting too detailed right now, you can create a Dockerfile and use docker build . to create a customized
container. For example, let the following be your Dockerfile:
FROM ubuntu:18.04
COPY index.html /
# Update Ubuntu software repository
RUN apt update
# Download python
RUN apt install -y python3-minimal
CMD ["bash"]
Each instruction creates one layer:
- FROM creates a layer from the ubuntu:15.04 Docker image.
- COPY adds files from your Docker client’s current directory.
- RUN builds your application with make.
- CMD specifies what command to run within the container.
I took this example from Dockerfile best practices page linked at the bottom.
Connecting Your Container to Your Host Machine
volumes are a way to share information accross containers or between your container and host machine. You can use volumes to pass data files back and fourth or to allow you to use a text editor to change code you have in your container. There are different types of volumes, but I’m going to show you how to connect a folder on your host to one in the container so you can edit some Perl code. Let’s say you have the following folder on your host machine:
~/Documents/my_folder$ ls
 my_code.pl  my_data.csv
To make edits to this code inside of a container, you can
create a volume to connect this folder to one in the container so when you edit my_code.py the changes will be made to both.
We can create a volume by using the -v tag e.g.
$ docker run -v /path/on/host:/path/in/container ...
You must use a full path on both ends to connect the two folders properly. So if you are on windows it would look something like:
$ docker run -v C:\Users\JohnSmith\Documents\my_folder:/home/my_folder -it ubuntu bash
Then you can run the ls command inside of your Docker container to check and see those files are now present.
root@accce7d7da8f:/# ls home/my_folder
 my_code.pl  my_data.csv
To show that we can edit the file on our host machine and see the edits in the container, we must first check what the file looks like, then
detach from our container, update the file, and then attach ourselves again. Below, we navigate to our folder on our host machine using cd, and then
use cat to output the contents of the file my_code.pl.
root@accce7d7da8f:/# cd home/my_folder
root@accce7d7da8f:/home/my_folder# cat my_code.pl
#!/usr/bin/perl
print "Hello, World!\n";
To detatch from a container we are currently connected to in an interactive session we can use ctrl+p+q. You should see something similar
to:
home/p# read escape sequence
This did not stop the container. We can verify this by running $ docker ps. You can now use your favorite editor to change our
file my_code.pl to (if you don’t have a favorite editor, just use Notepad):
#!/usr/bin/perl
print "I love Docker!\n";
Now to get back into our container we’ll use the attach command. Here’s the --help documentation for it.
$ docker attach --help

Usage:  docker attach [OPTIONS] CONTAINER

Attach local standard input, output, and error streams to a running container

Options:
      --detach-keys string   Override the key sequence for detaching a
                             container
      --no-stdin             Do not attach STDIN
      --sig-proxy            Proxy all received signals to the process
                             (default true)
This is how we actually run the command:
$ docker attach accce7d7da8f
Notice, we are still in the same directory as we were before. By executing our file we can see that it did indeed update!
root@accce7d7da8f:/home/my_folder# cat my_code.pl
#!/usr/bin/perl
print "I love Docker!\n";
Aside: you can use the following linux command to make our file an executable and then run the perl file:
root@accce7d7da8f:/home/my_folder# chmod u+x my_code.pl
root@accce7d7da8f:/home/my_folder# ./my_code.pl
I love Docker!
Another way for containers to talk to the outside world is by exposing ports. Using networks is one of the most important features of Docker.
Eventually, you should learn
how to use Bridge Networks which is how you can get containers to work with each other. This is a great resource if you want to know
more about connecting containers. But here, I’m
Going to provide a quick example of how to get docker to communicate with your host machine using the -p tag. The -p
after
docker run is to publish and link ports from the container to the host. The proper use is
$ docker run -p host-port:container-port ...
For example, you can run
$ docker run -p 8080:5000 ubuntu bash
which will map port 5000 inside the container to 8080 on your computer. It can be easier to understand if we walk through an example. Let’s create a container with a simple Hello World html file and run it on port 8000 using Python. We’ll start by creating a new folder and putting a Dockerfile and HTML file inside. The Dockerfile should be:
FROM ubuntu:18.04
COPY index.html /
RUN apt update
RUN apt install -y python3-minimal
CMD ["bash"]
The HTML file should be named index.html and should be:
<!DOCTYPE html>
<html>
  <body>
    <h1>Hello, World!</h1>
  </body>
</html>
Make sure to navigate to the folder we just created before using the following command. First we’ll build the new image from our Dockerfile and then use that image to create a container.
$ docker build .
If a name is not given to docker build it will check the folder for a file named Dockerfile. We’ll need the ID for the
image we just created. We can find this using the following command:
$ docker images
The output will look something like:
REPOSITORY                 TAG                 IMAGE ID            CREATED             SIZE
<none>                     <none>              3efb5e1e1c8c        42 seconds ago      157MB
<none>                     <none>              f1e12001051e        13 minutes ago      122MB
python                     latest              746a826ed9d7        2 weeks ago         922MB
ubuntu                     latest              74f8760a2a8b        2 weeks ago         82.4MB
<none>                     <none>              837806c31088        6 weeks ago         498MB
ubuntu                     18.04               113a43faa138        8 weeks ago         81.2MB
Then we use the ID of the image we just created to start a container.
$ docker run -it --rm -p 8888:8000 3efb5e1e1c8c bash
In the container run
root@bdbfba60586d:/# python3 -m http.server
After you run this command in you should see the following response:
Serving HTTP on 0.0.0.0 port 8000 (http://0.0.0.0:8000/) ...
which means it has started a local host server on port 8000 in the container. Since we map it to 8888 on our host machine,
you should go into your web-browser and go to http://localhost:8888. You should see our lovely “Hello, World!”. It is
interesting to note that you don’t have to pick a port on your host machine. You can have docker automatically pick an open port by just
omitting that part of the command. For example, you can run
docker run -dt -p :8000 3efb5e1e1c8c
and then use docker -ps to check our running containers.
$ docker ps
CONTAINER ID    IMAGE           COMMAND    CREATED          STATUS          PORTS                      NAMES
c79e816c9ae0    b9d14cb0304c    "bash"     3 seconds ago    Up 2 seconds    0.0.0.0:32770->8000/tcp    upbeat_kapitsa
As you can see above, Docker mapped port 8000 in the container to port 32770 on my host machine.
Conclusion
I hope you found this introduction useful and easy to follow. Feel free to reach out to me if you have any questions!
More Resources:
- Getting Started The introduction documentation on Docker’s website. This is kept current and may be your best resource.
- Servers for Hackers This is the blog I took most of my information from originally. It was written back in 2014 and is now a little out of date.
- Learn Docker in 12 Minutes A YouTube video that dives in and explains Docker pretty well.
- Docker Curriculum Written back in 2015, but shows how to get get started with AWS and web applications.
- Dockerfile Best-Practices